
REMOTE WORK • TECH • GUIDES
Your plain-English guide to remote work tech
Clear picks and how-tos for cloud backup, zero-knowledge storage, VPNs, collaboration tools, and gear for working anywhere.
Disclosure: Some links are affiliate links. We may earn a commission if you buy. This does not affect our recommendations.
iDrive setup: this guide walks you through install, choosing a private encryption key, selecting the right folders, adding an optional local SSD, and finishing with a five minute restore so you know recovery works. When you reach the end, you will have a dependable cloud backup and proof you can restore a file on demand.
Who this is for: remote workers, freelancers, and small teams who want a reliable backup without guesswork.
Time required: 15 to 25 minutes for setup. The first full backup runs in the background.
What you need: an iDrive account, the desktop app for Windows or macOS, a stable internet connection, and an optional external SSD.
Table of Contents
Prerequisites
- Create or sign in to your iDrive account.
- Download the latest desktop app for Windows or macOS.
- Decide if you will use a private encryption key. If you choose a private key, store it in a password manager and keep an offline copy. If you lose it, your data cannot be recovered.
- (Optional) Connect a portable SSD if you want a fast local backup in addition to cloud.
iDrive setup: download and install
- Install the app and sign in.
- Confirm the version number in the About dialog so you can match future updates.
- Allow requested permissions. On macOS, grant Full Disk Access so protected folders are included.
Why this matters: correct permissions prevent silent skips and incomplete backups.

Choose your encryption key
You have two options:
- Default key managed by iDrive: easiest to start. You can reset your account password and still restore files.
- Private key that only you know: best for privacy and compliance. Your files are encrypted end to end. If you lose this key, restores are not possible.
Recommendation: if you handle client data or sensitive work, use a private key. Write it down securely, save it in your password manager, and keep an offline copy. Perform a restore test right after setup.

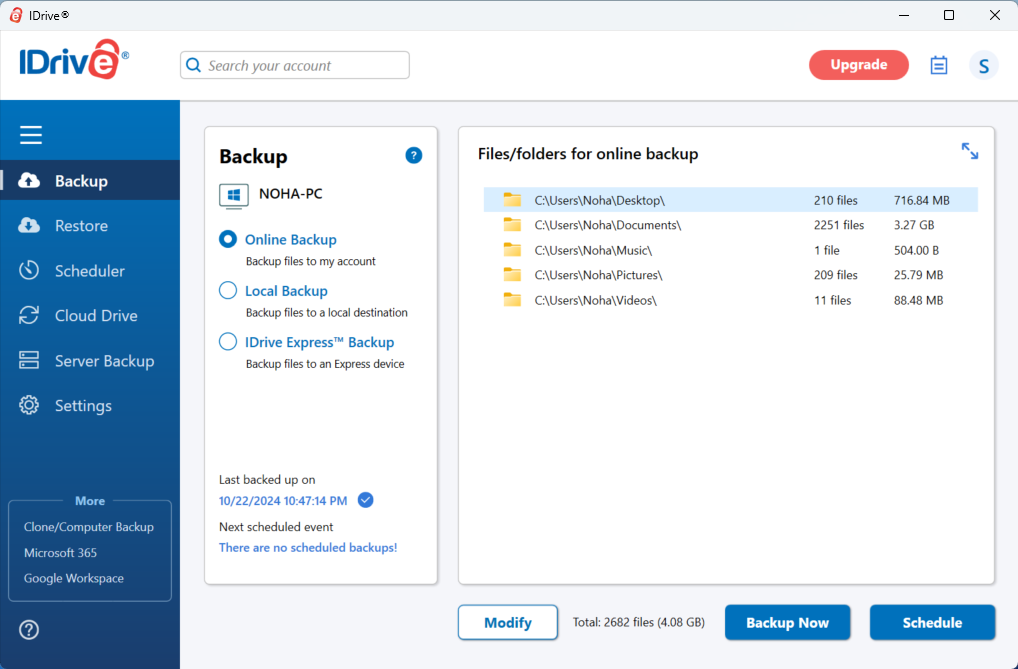
Select folders to protect
Back up the folders you actually work from. A focused set finishes the first run faster and reduces clutter.
Include
- Desktop, Documents, Pictures, and active project folders
- Client or repo folders with daily changes
- Exports for creative apps and accounting files
Exclude
- System folders and caches
- Downloads if it is mostly installers
- Large virtual machines you do not need daily
- Temporary render files or build artifacts that can be regenerated
Tip: create a small text file named Restore Test.txt inside one of the protected folders. You will use it in the restore test.
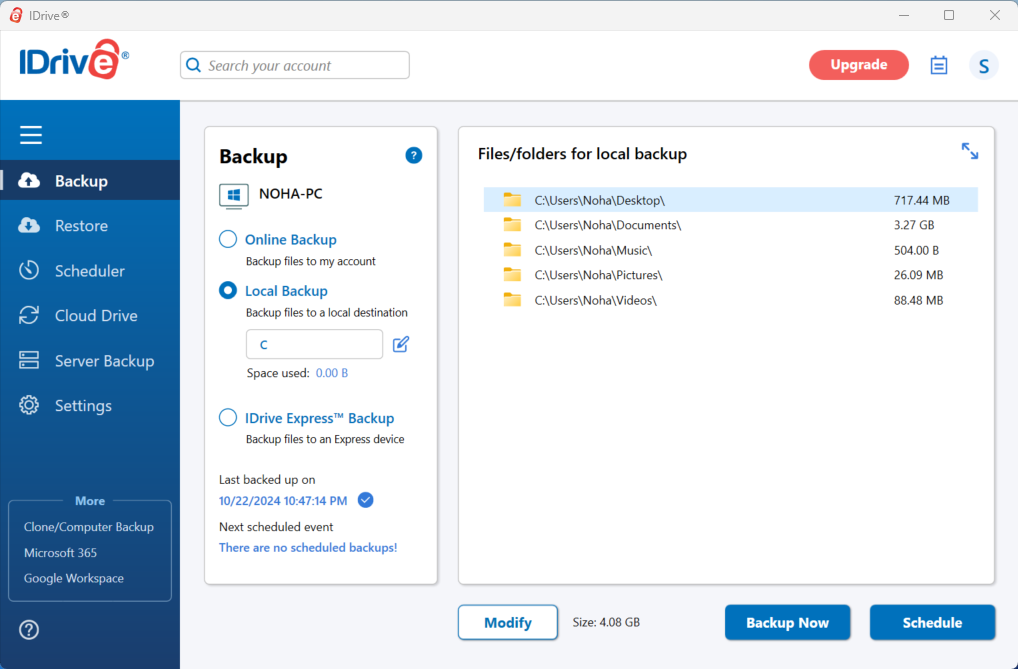
Add a local backup on an external SSD (optional)
A local copy gives you the fastest restores and protects you when the internet is slow. This is the second copy in a 3-2-1 approach.
- Connect your external SSD.
- In iDrive, add the SSD as a local destination.
- Give the drive a stable name or letter so the app can find it.
- Set a weekly reminder to plug it in if you travel.
When to skip: if you have no spare drive or you work only from a cloud desktop. You can add local backup later without redoing the cloud setup.
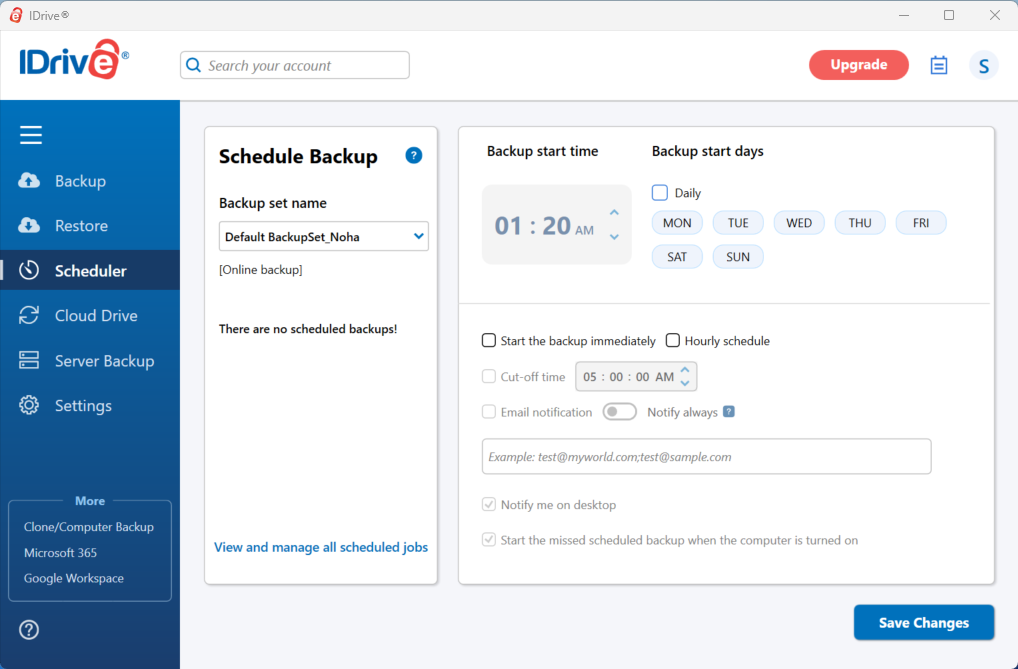
Schedule and performance settings
Schedule
- Daily at a time you are not working. Night is ideal.
- Enable Continuous Data Protection (if available) for key folders to capture frequent edits.
Bandwidth
- Start with no throttle.
- If your connection bogs down, set a gentle upload limit during work hours and remove it at night.
Laptop power
- Allow on battery only if you travel often. Otherwise, back up when plugged in.
Versioning and retention
- Keep at least 30 days of versions for documents and source files.
- Use longer retention for critical archives or client folders.
Run your first backup
- Start the backup.
- Watch the progress bar until you see steady uploads.
- If you have many gigabytes, let it run overnight.
- Confirm that the app reports success for a few folders before moving on.
Expectations: the first run may take hours or days depending on size and upload speed. This is normal. Future runs are faster because iDrive uploads only changed blocks.
Five minute restore test
This is the most important part of your idrive setup. It proves you can get a file back.
- Open the Restore tab.
- Find Restore Test.txt (or another small file you know changed).
- Choose the latest version and restore it to a new folder on your Desktop named Restore Proof.
- Open the file to confirm it is intact.
- Note the file size and time of restore.
What success looks like: you can browse backed up folders, see versions, restore the file quickly, and open it without errors.

Restore proof
Outcome: Restored Restore Test.txt (2 KB) on 2025-08-14 at 12:40. Version history shows two versions. File opened without errors.
Common pitfalls and quick fixes
Backups feel slow
- Let the first run go overnight.
- Exclude large archives that rarely change and back them up weekly.
- If possible, connect over Ethernet for the first run.
Files are skipped
- Close apps that lock files, then retry the backup.
- On macOS, add iDrive to Full Disk Access.
- On Windows, ensure your account has permission to the folders.
Not enough space
- Reduce the set to essential work folders first.
- Use storage analytics to find large folders.
- Upgrade the plan only if you consistently exceed limits.
External SSD not found
- Reconnect the drive and confirm the same volume name or letter.
- Re-add the destination in settings and run a local job manually.
Conflicts or unexpected versions
- Keep versioning on and retain at least 30 days.
- Restore to a new folder so you do not overwrite the original.
Smart settings after week one
- Notifications: turn on success and failure emails or push alerts so you know backups are running.
- Exclusions: add noisy cache or temp folders discovered during the first week.
- Mobile backup: enable camera roll backup if you use your phone for work photos.
- NAS or network shares: back up a mounted share only if your plan supports it and the connection is stable.
- Work-hour throttling: full speed at night and a gentle cap during the day.
3-2-1 in practice for remote workers
A practical plan is simple to follow and easy to audit.
- Three copies: your laptop, iDrive cloud, and an external SSD
- Two different media: internal drive and SSD cover that
- One offsite: iDrive cloud satisfies the offsite rule
Monthly habit: restore a single file from last month and update the Restore proof line with the date. This keeps you honest and catches issues early.
Mini troubleshooting guide
Authentication failed — Sign out and sign back in. Verify two-factor if enabled.
Permission denied — On macOS, grant Full Disk Access. On Windows, check user rights and ownership.
Network timeout — Pause and resume. Try at a different time. Consider a temporary throttle during peak hours.
App crashes or stalls — Restart the app, then reboot if needed. If it repeats, reinstall and keep your configuration notes.
Restore is very slow — Restore a small file to test. If small restores are fast, the bottleneck is size or network. If you kept a local copy, restore locally first.
FAQs
Does iDrive support multiple devices on one plan?
Most personal and business plans allow multiple devices. Check your plan details.
Can I use a private encryption key?
Yes. Keep it stored safely. If the key is lost, data cannot be recovered.
Does iDrive back up NAS or network shares?
Yes on supported plans. Performance depends on your network and device. For best results, connect the share by a stable Ethernet link.
What about the first year price and the renewal?
The first year often includes a discount. Renewal is typically higher. Check the current offer before you buy.
Can I restore to a different computer?
Yes. Sign in on the new machine, choose the device from the list, and restore to a new folder. Keep your private key available if you used one.
What to do next
- Keep the app running and let the first backup complete.
- Set a monthly calendar reminder to perform a one-minute restore check.
- Add your external SSD to a weekly routine if you chose local backup.
- Read the comparison to understand tradeoffs with other services.